OnSite AI Platform
Clevercast OnSite is a web application for AI speech transcription and translation in real-time, delivering text and audio to event audiences without latency.
Introduction
What is Clevercast OnSite used for?
Clevercast’s OnSite platform makes live speech more accessible to on-site audiences. During an event, speech can be enhanced in several ways:
- Live text transcription on screens: display a real-time transcript of the spoken content on screens in the venue, so attendees can read along.
- Live text access on personal devices: give participants access to the live transcript on their own devices (such as smartphones, tablets, or laptops). The transcript can be shown in the speaker’s original language or in one or more translated languages.
- Live audio translation on personal devices: provide participants with a real-time audio translation, allowing them to listen through headphones when a speaker uses a language they do not understand.
The platform supports multiple speakers and multiple spoken languages, and works across all common devices. Participants only need a modern web browser; no installation is required.
Throughout this manual, the term “application” or “in-browser app” refers to the Clevercast web-based interface used by event participants in their browser.
How does it work?
1. Broadcasting audio to Clevercast
First, create an Event in Clevercast and send your audio feed to it.
The easiest way to do this is by using WebRTC directly from a web browser. Clevercast allows you to establish a secure connection between your audio source and our WebRTC servers. Once connected, no further configuration is needed.
Alternatively, you can send audio using SRT or RTMP. In these cases, a video broadcast is also required, but Clevercast ignores the video stream. You can therefore send a static image or a black screen, along with the audio feed. For maximum reliability, you may configure redundant streams to Clevercast’s main and backup streaming servers, which are hosted in different geographic locations.
The incoming audio stream can be monitored at any time in the Management Room within Clevercast.
2. Real-time AI processing
Clevercast’s AI engine converts incoming speech into text in real-time. The live transcript can be viewed within Clevercast and is streamed directly to the in-browser app used by your audience.
You can also enable real-time translations, delivered as:
- translated text transcripts, and
- translated audio (also known as remote simultaneous interpretation).
To improve transcription and translation accuracy, you can define a custom vocabulary. This allows you to add specific terms such as names, abbreviations, or technical jargon. The AI will take these terms into account for speech recognition, spelling, and translation.
Clevercast also supports events with multiple spoken languages. You can enable automatic language detection, and you can manually set or override the currently spoken language within Clevercast.
3. Using the in-browser app
Clevercast provides an in-browser app for event participants. As organizer, you can share access in several ways:
- by displaying a QR code, or
- by providing the unique event link from Clevercast.
You can also generate and share a link for a specific translation, so participants automatically see and/or hear content in their preferred language.
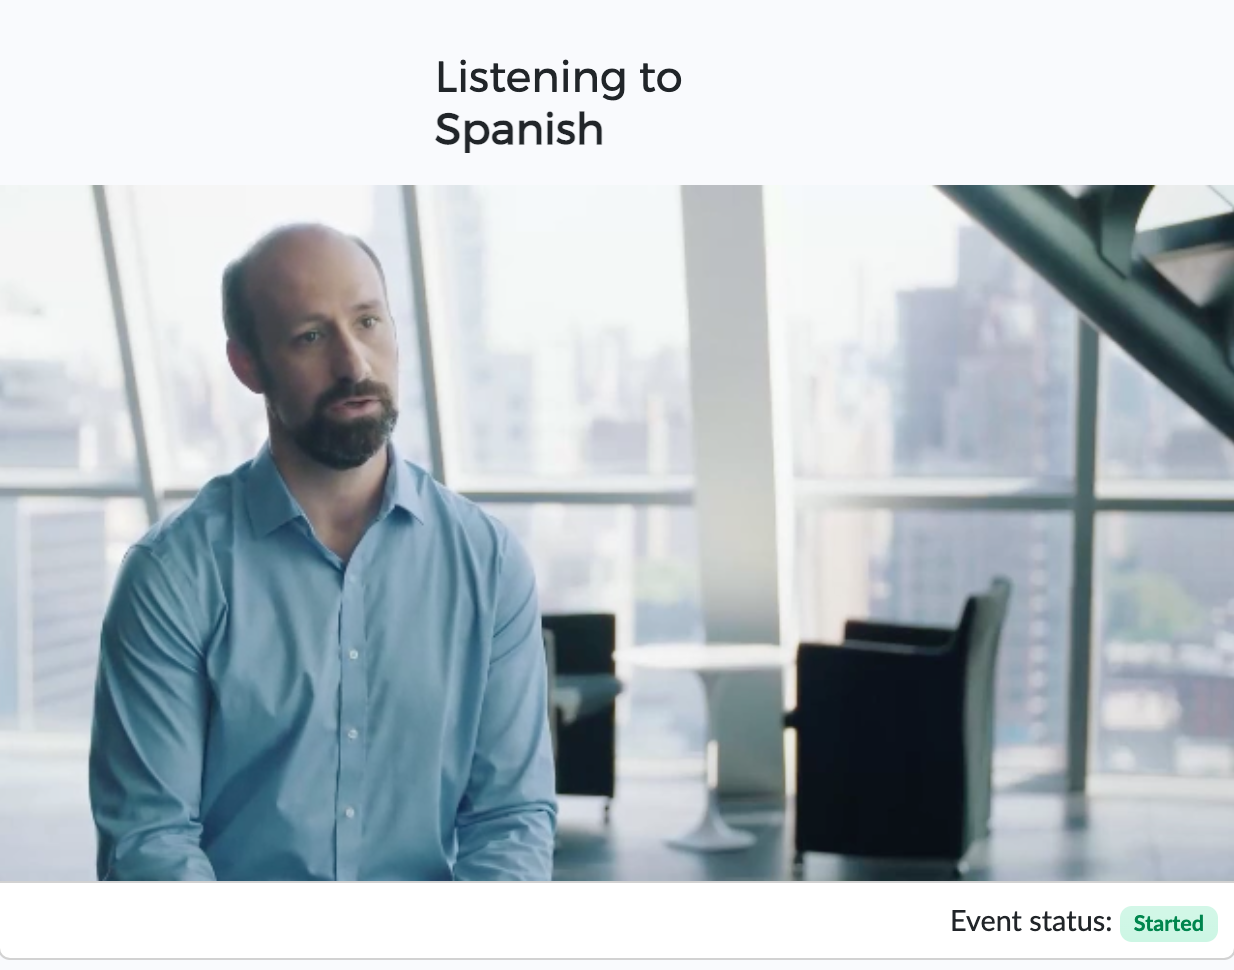
For text-based access, the app shows an automatically scrolling transcript.
![]()
- Real-time transcription of the spoken language typically has a delay of approximately 1–2 seconds.
- Translated transcripts typically have a delay of 2–4 seconds.
You can manually adjust this delay. Note that a longer delay allows the AI to improve transcription and translation quality.
Audio translations use the same delay settings as text transcripts. When multiple languages are spoken, Clevercast automatically pauses audio output when the speaker is speaking the same language as the selected language in the app.
Difference with Clevercast Enterprise
Clevercast OnSite uses audio as input and provides real-time text transcription and/or audio translations as output.
Clevercast Enterprise, on the other hand, is a live video streaming solution. It uses streaming video as input and delivers streaming video as output, enriched with closed captions and audio translations. Because live video is typically streamed with latency, the AI can be provided with more context. The additional context allows for higher transcription and translation quality.
Note: our on-site features can be combined with live video streaming for the same event, but this requires a Clevercast Enterprise license. See the Enterprise Platform manual for more info.
Platform Overview
This section explains how administrators can use the OnSite Platform to broadcast audio to Clevercast and configure the real-time text transcriptions and audio translations. It starts by introducing the main menus of the platform and providing a brief explanation of the terminology used within Clevercast.
After a general walkthrough of the platform, this manual takes a closer look at Event management. In Clevercast, an Event represents the complete set of settings and tools, which are used to manage an audio input and generate transcriptions and translations for end users.
Please note that this section covers the administration platform, which is only accessible with administrator credentials. Information about the in-browser application for end users, which does not require authentication, can be found at the end of this manual.
The Dashboard page
The administration platform is only accessible to admin users with valid login credentials. After logging in, a user is directed to the dashboard. The contents of the dashboard depend on your plan and permissions.
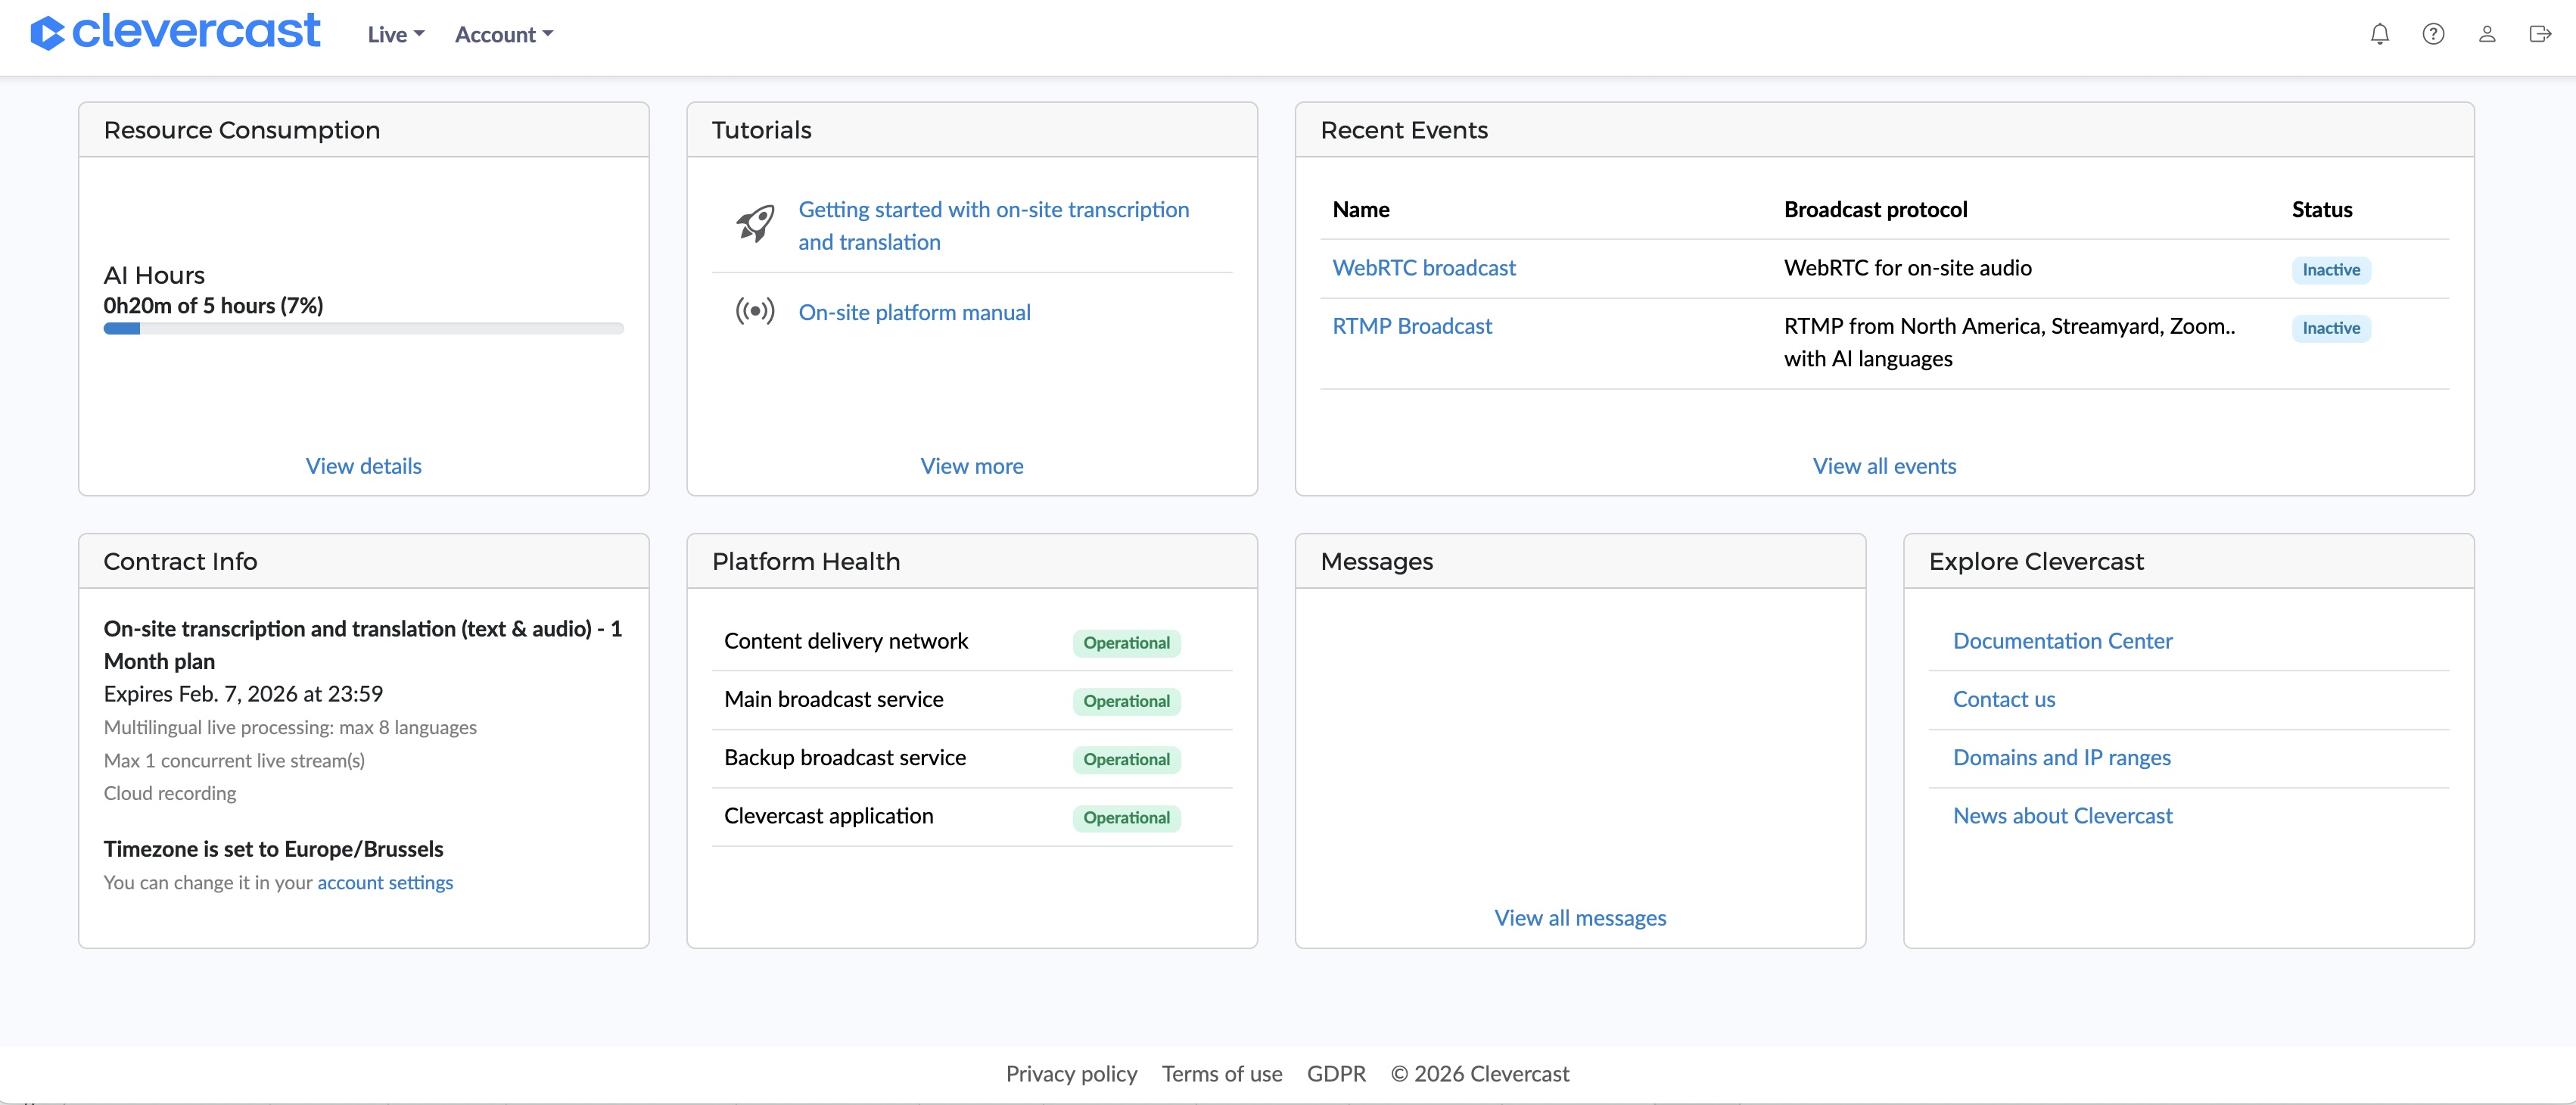
The dashboard panels contain links, allowing you to go directly to a specific menu and page. On top of the page are the top-level menus, which allow you to navigate through the platform.
The Live menu
The Live menu and its Events submenu contain the main functionality of this platform. It lets you create and manage live audio streams, and control how AI transcriptions and translations for on-site organizers and participants are generated.
Note: unless specified otherwise in your plan, your account allows for one simultaneous live stream. This means that you cannot broadcast to two events at the same time.
The Account menus
The Account menu contains the following sub-menus:
- Overview: information about your plan and the resources usage of your account (mainly AI hours)
- Settings: lets you change the general settings of your account
- Users: allows you to add, manage and delete administrators, which can log into Clevercast with their email address and password.
- AI Vocabularies: lets you create and manage account-level vocabularies. Their purpose is to store terms and metadata that are supplied to the AI engine (see below). This way, reuse a vocabulary in different events.
Live Events
In Clevercast, an Event represents the complete set of settings and tools, which are used to manage an audio input and generate transcriptions and translations for end users. This section explains how to create and manage an event.
Before you start
A (live) event always has a certain status, which determines if your broadcast is processed and turned into real-time transcriptions and translations. Additionaly, the status determines whether your on-site users have access to the transcriptions and translations. When they don't, the in-browser app will display an image or messagee, which you can set yourself via the appearance tab tab.
The event status can be:
- Inactive: While the event status is
Inactive, it is not ready to receive a broadcast. - Preview: After setting the status to
Preview, you can start broadcasting. When a broadcast is incoming, Clevercast admins can see it in the Realtime Management room. The on-site production team already has access to the transcripts (for display on a screen). However, event participants do not have access; they will see the Preview image/message in the in-browser app. - Started: When you press the ‘Start event‘ button, the in-browser app detects this and makes the transcriptions and translations available to on-site participants (the Preview image/message automatically disappears).
- Paused: When you set the event status to
Paused, Clevercast keeps processing the incoming stream but but removes access for on-site participants. The in-browser app automatically detects the status change and shows the Paused image/message. The transcriptions and translations remain available to Clevercast administrators and to the on-site production team. - Ended: When you set the event status to
Ended, Clevercast stops processing the live stream. The in-browser app detects the status change and shows the Ended image/message.
The real-time management room in Clevercast is only available when the event status is set to Preview, Paused or Started. When the status is set to Inactive or Ended it is not possible to connect to the room.
Note that an event with AI-generated captions or speech currently has a maximum duration of 24 consecutive hours. If your event spans multiple days, set the event to Inactive or Ended during breaks and reset it again.
Creating a live event
To create a new live event, use the 'Live > Events' menu to go to the events overview page, and press the 'Create AI Multilingual Event' button.
The Event page
The event page consists of a number of tabs, which allow you to manage the different aspect of a live stream. Which tabs and settings are available depends on the broadcast protocol and the features of your plan.
All tabs display the current event status and the main and backup broadcast statuses. When a broadcast is being received by Clevercast, this is set to Started.

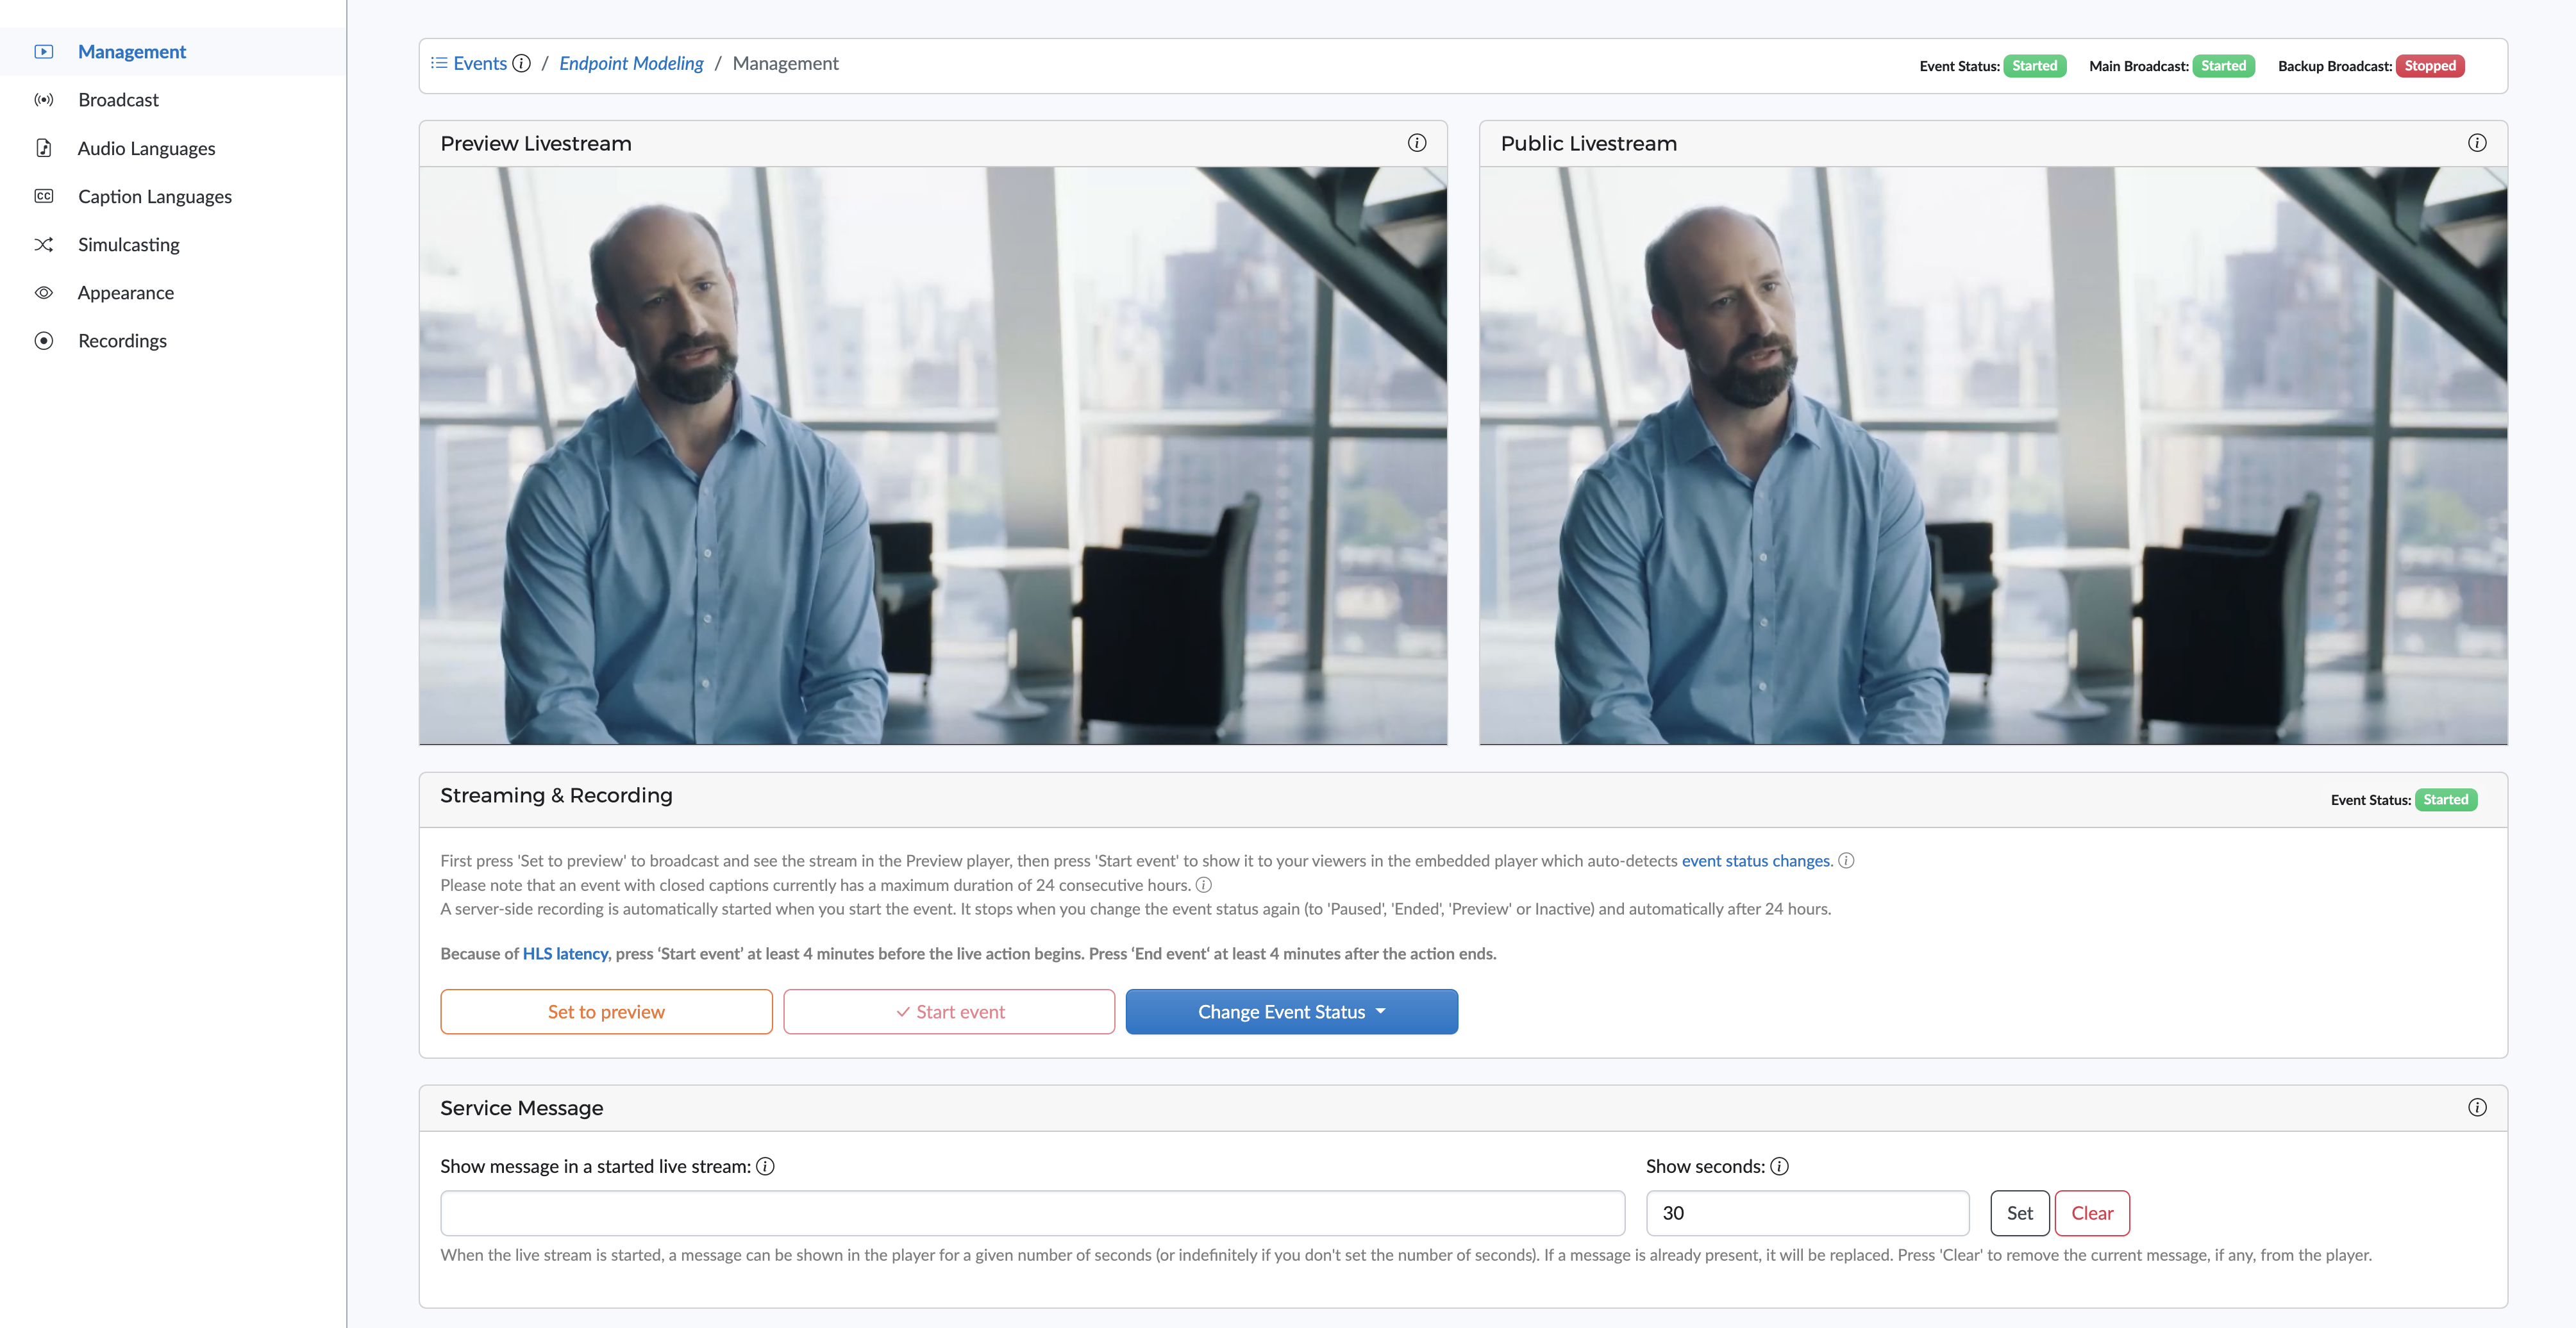
Management
The Management tab lets you change the event status and go to real-time management room. It also contains the links to the application for the production team and on-site participants. An event also has a Name and Description, for your own information.
The Set to preview, Start event and Change Event Status buttons allow you to change the status of the event. Be aware that a status change may take some time.
Broadcast
The Broadcast tab contains the settings for your encoder or application to configure the broadcast to Clevercast.
For most broadcast protocols, Clevercast supports a fully redundant setup, which allows you to broadcast to a main and backup server on different geographical locations. Use the settings in the Backup Broadcast panel to send the same broadcast to both servers simultaneously. Clevercast player will detect if one of the streams is down and automatically failover to the backup stream, without your viewers having to refresh the page. This is also the case for the remote interpretation and captioning rooms.
For more info, see our guide on configuring your encoder or relay app.
Audio languages
The Default language
The 'Audio Languages' tab lets you set the default language, which refers to the main language spoken in your broadcast (also known as the floor language).
If the floor audio contains multiple languages, you can select Original instead of a real language. In that case, the application's first language will be called ‘Original’ and contain the broadcasted audio, no matter what language is spoken.
AI Speech languages
Clevercast lets you add simultaneous speech translations, generated by AI (also known as synthetic voices or AI dubbing).
For each language, Clevercast lets you choose a male or female voice. For certain languages (e.g. English, Spanish, Portuguese, French, Dutch) you can also choose a specific regional pronunciation (e.g. British, US, Australian or Indian English).
For more info, see the Audio languages section of our AI Live Streaming Manual.
Caption languages
This tab lets you manage the speech-to-text conversion and transcriptions. It also lets you add translated text transcriptions in different languages. The transcriptions have the form of a real-time scrolling transcript without delay. They can be projected on a screen by the production team, or shown on the devices of on-site participants.
The settings on this tab let you configure the language model, which is responsible for the speech-to-text conversion and text-to-text translation. Note that speech-to-text conversion is also needed if you only provide audio translations.
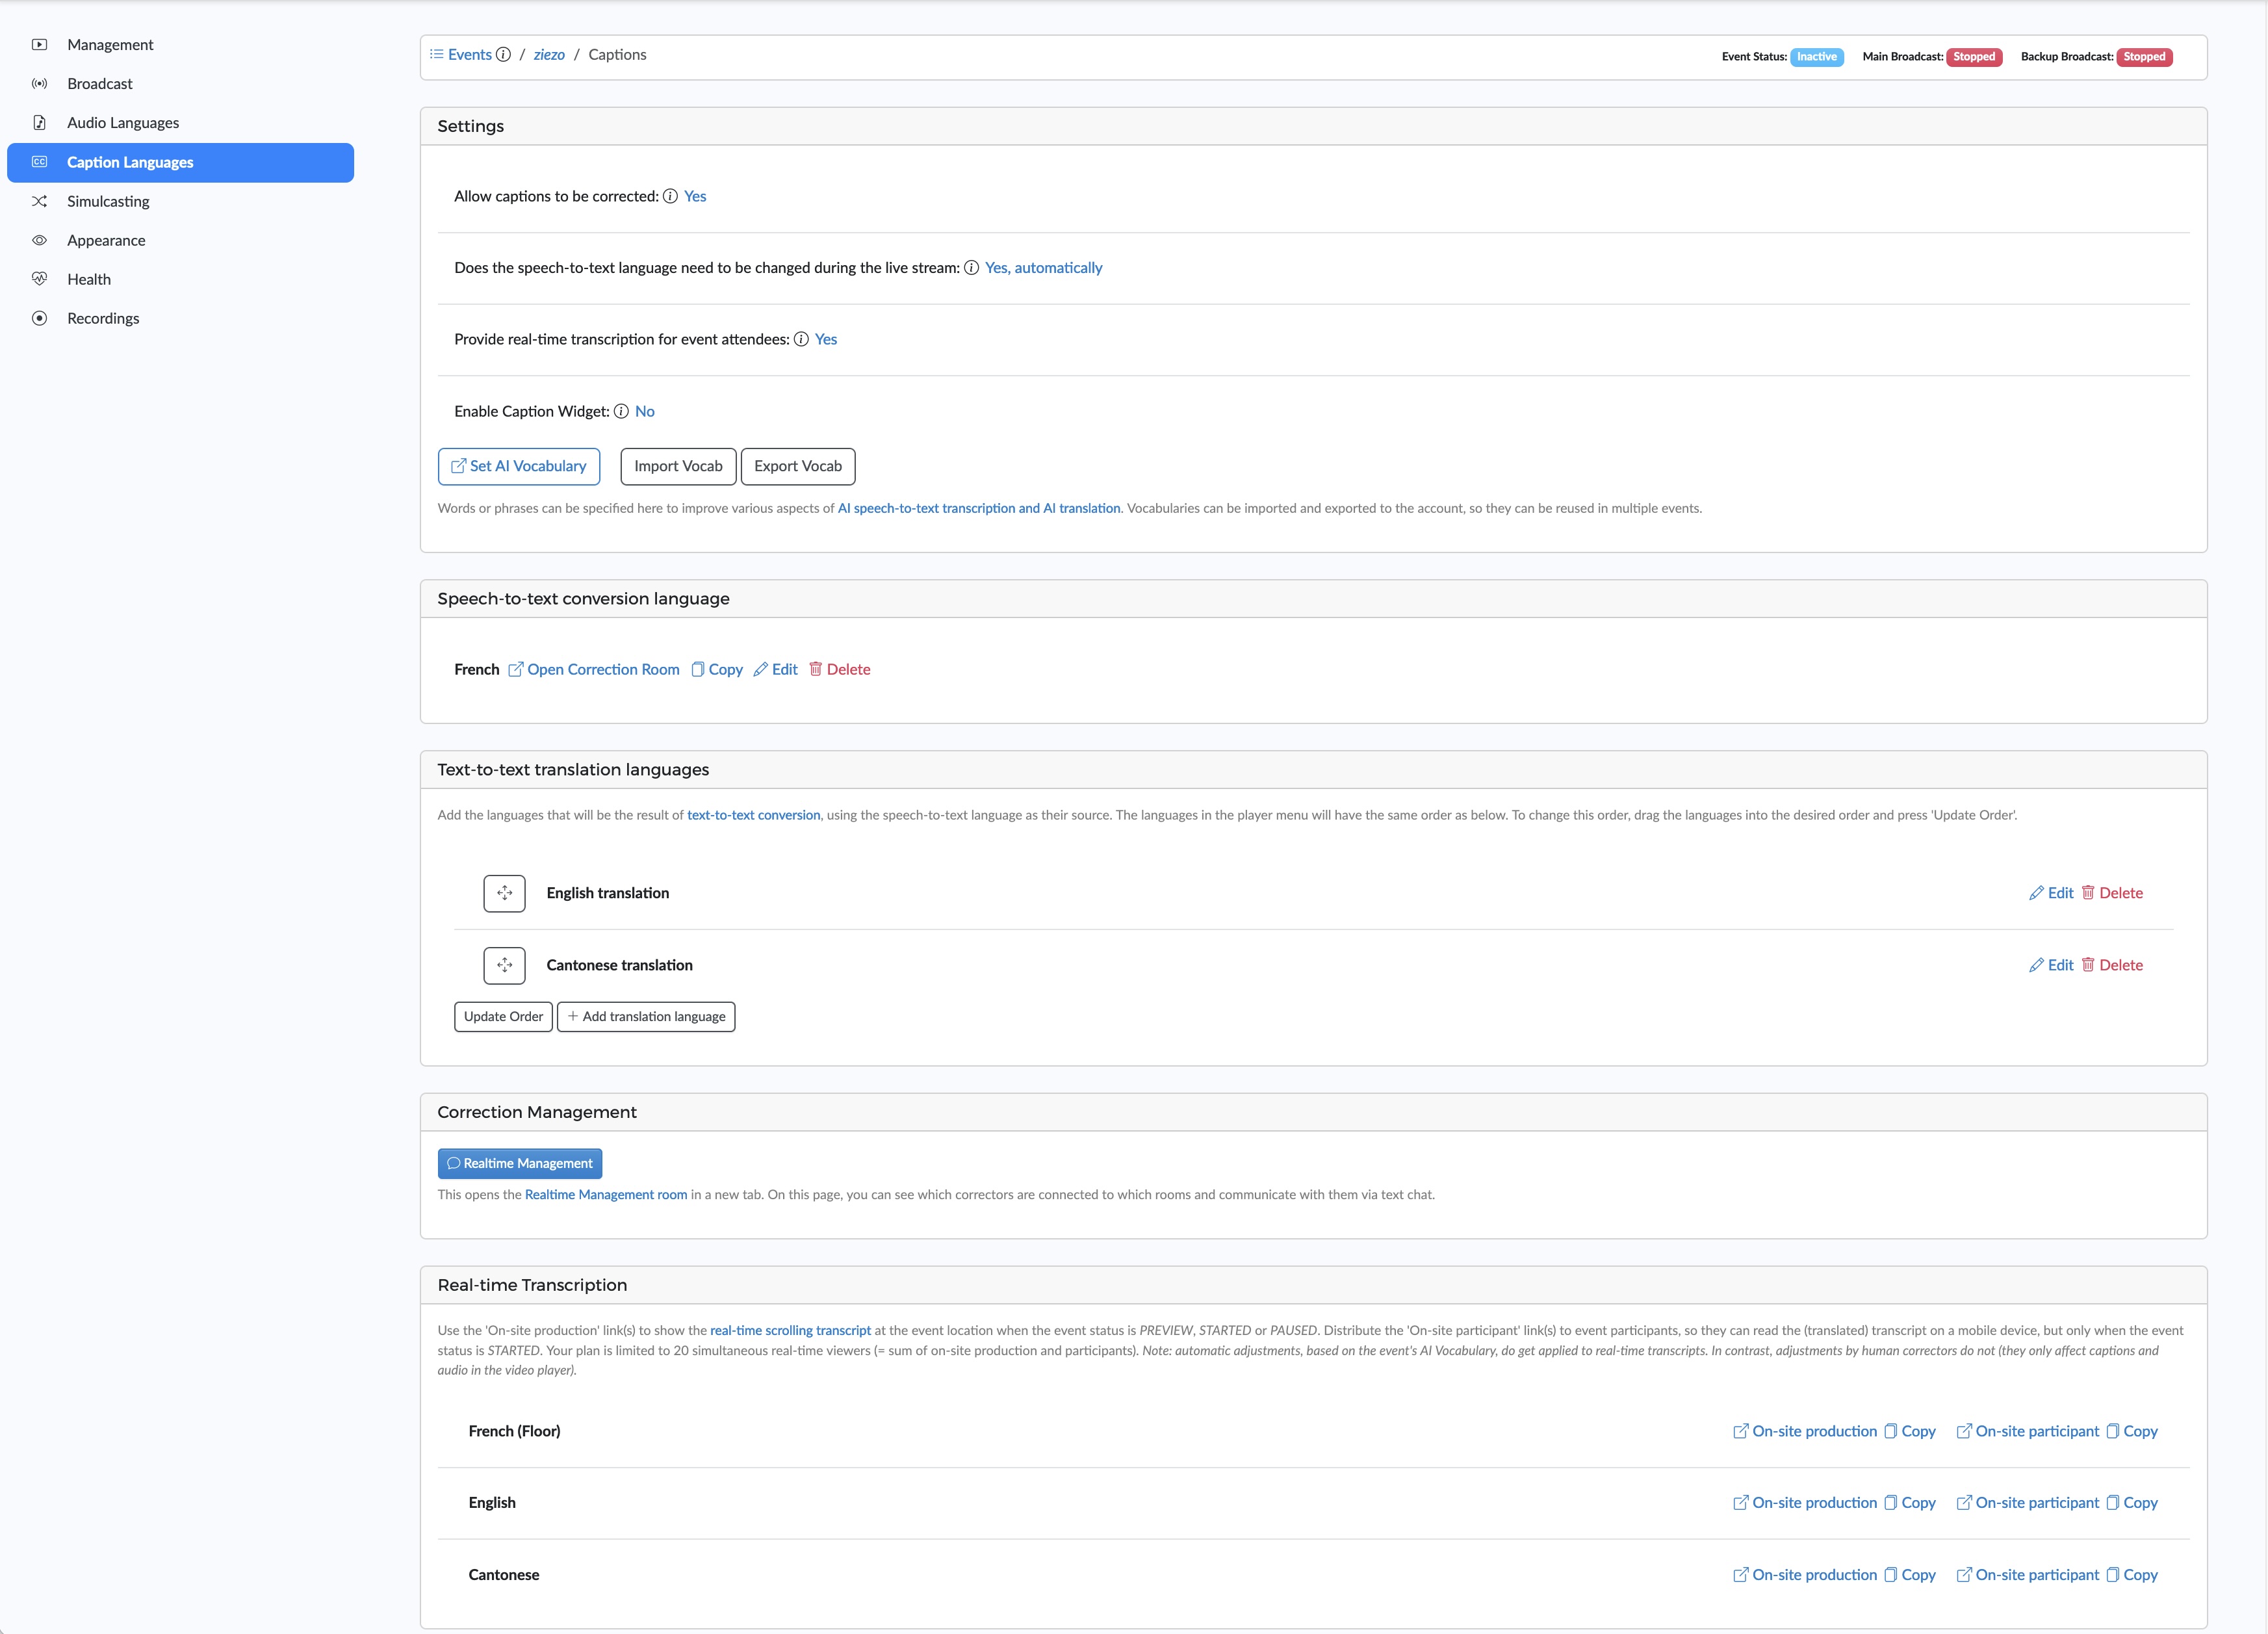
This tab also provides access to the AI vocabulary, which lets you define terms specific to your live stream. These are used by the language model to improve the speech-to-text conversion.
Appearance
The Appearance settings lets you set a separate image (or message) for each event status, or a single general image for all statuses.
- Images: images displayed in the on-site app when the event status is not
Started. You can set a separate image per status and/or a general image that will be displayed for each status without an image. - Messages: messages displayed in the on-site app when the event status is not
Started. A message will only be displayed if no image is available. If no image or message is set, Clevercast will display its default message for the status.
Health
The Health tab is only displayed when your broadcast uses RTMP or SRT, to give you feedback about the broadcast's health. If you use WebRTC (directly via your browser), the Health tab is not shown.
The information on this page indicates when Clevercast receives your broadcast. It includes warnings concerning the configuration of your encoder, an incorrect bitrate or frame rate, a choppy stream.... The messages on the health page can have three different levels:
- Info: these are messages for informational purposes. For example to indicate that an incoming stream is detected.
- Warning: these messages are displayed if your broadcast is not in line with our recommendations or best practices. By themselves, these are not major issues, but they may cause lower quality or give rise to other problems (e.g. a frame rate that is too high may cause not all frames to arrive in a timely manner).
- Error: these are issues that will give rise to a failing or faltering stream. They require you to take action.
Errors and warnings are also shown at the top of all other event tabs.
On-site application
The on-site app provides the real-time transcription(s) and/or translation(s). They can both be used by the production team, for display on a screen, and by event participants, to read the transcription and/or listen to the audio translations.
For each language there is a secure link on the event management page. As an event manager, you are responsible to distribute these links to the relevant participants.
When the event starts, participants only need to open these links in a browser with sufficient support for WebRTC (Chrome, Firefox, Safari, Edge) and press the play button. Participants will automatically see and/or hear the correct language. Note that the number of real-time participants is limited and their maximum number is determined by your plan.
Note: in case of multilingual events, with the speech-to-text language being configured to change language, the on-site participants will hear nothing when the speaker is speaking their own language (so they can listen directly to the speaker).